Having trouble adding audio to your videos in KineMaster? Don’t worry! Whether you’re new to video editing or just having some issues, I’m here to help. This easy guide will show you step-by-step how to add audio to your KineMaster project, so your videos can sound great and look professional.
KineMaster has some great audio tools to make your videos sound great. You can add background music, sound effects and more to enhance your video. This guide will show you how to use these tools easily.
How To Add Audio in KineMaster?
Step 1: Open Your Project in KineMaster
Start by launching the KineMaster app on your device. Once the app is open, select the project you’re working on. If you haven’t started a project yet, import your video or image files into KineMaster.
Step 2: Access the Audio Options
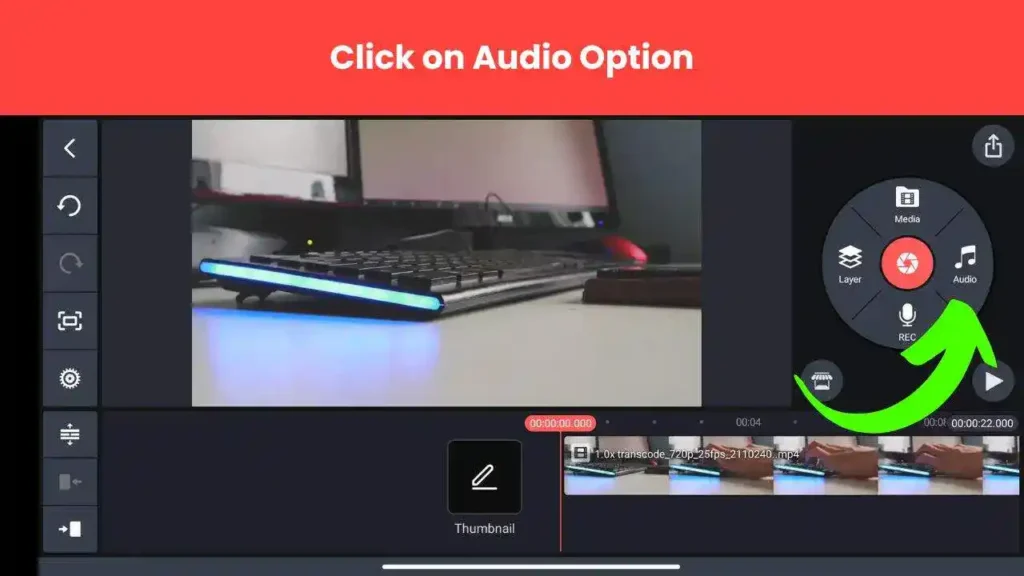
With your project open, look for the audio option on the right side of the screen. This button will give you access to all the audio features available in KineMaster.

Step 3: Explore Audio Options
On the left side, you will see several audio categories such as Music Shorts, Music, and Sound Effects. Browse through these options to find the audio that suits your project.
Step 4: Download Audio from KineMaster’s Library
If you want to use music or sound effects from KineMaster’s own library, tap the “Get Music” option. This will take you to KineMaster’s audio library where you can explore and download various tracks and sound effects to use in your video.

Step 5: Import Audio from Your File Manager
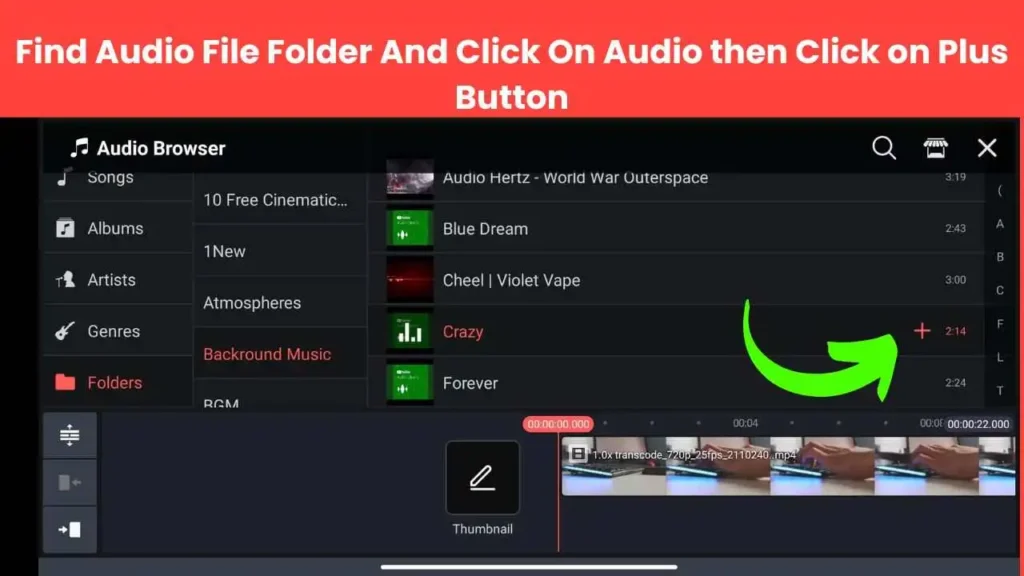
To add audio files from your own collection, navigate to the folder in your file manager where your audio files are stored. Locate the desired audio file and tap on it. Then, click the plus (+) icon to add this audio to your video timeline.
Step 6: Add Audio to Your Video Timeline
Once you’ve selected your audio file, it will be added to your video timeline. You can now adjust the timing and placement of the audio to fit your video perfectly.

Step 7: Export Your Edited Video
After successfully adding and adjusting the audio, it’s time to export your video. KineMaster allows you to export your project in various formats, so choose the one that best fits your needs.
Tips for Choosing the Right Audio
Choosing the right audio can really improve your video:
- Match the Mood: Pick music or sounds that fit the feeling you want for your video.
- Keep It Simple: Don’t use too many sounds—less is often better.
- Check Permissions: Make sure you’re allowed to use the audio and give credit if needed.
Conclusion
Adding audio in KineMaster is easy and can make your videos more interesting. Simply follow these steps to add music and sound effects to your project. For more video editing tips and tutorials, keep visiting our website. Thanks for reading!